Wednesday, November 30, 2011
Bake it Forward
Bridget from Bake at 350 posted helpful baking/decorating tips for the upcoming holiday and thought I would share them with you. Her post definitely puts my mind at ease and know that if I start early enough, I'll have plenty of baked and decorated goods for everyone. :) I'm so excited and I just can't wait to get started on my holiday baking.
Tuesday, November 29, 2011
Caramel Pecan Pie Shortbread
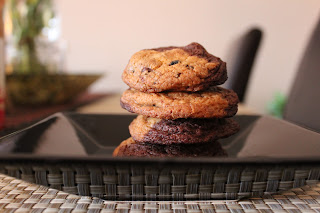
I like to salvage as many ingredients as I can when I'm faced with a baking disaster. As I've mentioned twice before, I failed at making pecan pie cookies for a bake sale. I came up with the idea of using the pecan pie filling to make mini pecan pie cookies, which was another FAIL, but was able to use the remaining filling for caramel pecan pie shortbread. The third time really was a charm. (Actually, I felt sick to my stomach just thinking about trashing $10 worth of pecans and good, quality chocolate).
I can still remember how good the shortbread was in the lemon bar recipe I posted during my early blogging days, and wanted to whip up something quick the morning of Thanksgiving. Less than 45 minutes later, I had these decadent bad boys packed and ready to go for our holiday lunch at my mom's house:

The shortbread was perfectly baked and the filling was to die for. It was surprisingly chewy and had the slightest hint of cinnamon. Not too sweet and not to bitter (I used extra dark cacao baking chips and used the remainder of my semi-sweet chips) Mmm....another recipe that is up for the dessert menu for Christmas. :)
Caramel Pecan Pie Shortbread
adapted from Baker's Royale and Tita Terry's Lemon Bar Recipe
Caramel Pecan Pie Filling from Baker's Royale:
1 cup pecans, toasted and chopped
4 ¼ oz chocolate, 65% cacao, melted
1 tablespoon of corn syrup
¼ cup heavy cream
½ teaspoon cardamom (I used cinnamon)
not called for in original recipe, but I did use about two tablespoons of caramel sauce
not called for in original recipe, but I added 1/2 tsp fleur de sel
Shortbread recipe:
1/2 c butter
1 1/3 c unsifted flour
1/4 c sugar
1 1/3 c unsifted flour
1/4 c sugar
Mix crust ingredients low speed til blended. Pat into greased 8" square pan. Bake at 350 near center open rack for 15-20 min.
Pour caramel pecan filling over crust, return to oven 18-20 min or til set.
Pour caramel pecan filling over crust, return to oven 18-20 min or til set.
Monday, November 28, 2011
Giving Thanks
I hope all of you had a wonderful Thanksgiving! My apologies for not uploading any new posts last week. I had a major case of the baking blues after my disaster with those pecan pie cookies, but redeemed myself by winning first place in our cookie exchange last Saturday. :)
There was an endless amount of delicious cookies, one of which I made for Thanksgiving. The pumpkin pie cookies were "puffy, pillows of goodness" according to my co-worker, Tony. Pictures and recipe to follow shortly.

The winning cookie :)
There was an endless amount of delicious cookies, one of which I made for Thanksgiving. The pumpkin pie cookies were "puffy, pillows of goodness" according to my co-worker, Tony. Pictures and recipe to follow shortly.
Along with the pumpkin cookies, I also made caramel pecan pie shortbread with the leftover filling from my previous post. I used my Tita Terry's recipe for the shortbread. So delicious. I loved the hint of cinnamon in the filling and the salted caramel.
I was baking up quite a storm the morning of Thanksgiving, but the baking did not stop there. I planned a birthday dinner for the bf at Shabu House in Burlingame on Saturday and wanted to make toffee crunch cupcakes. Every time we go to the grocery store and are making our way down the baking aisle, he always mentions (drops hints) of craving toffee cookies. Cookies just don't scream "birthday" to me so I decided to make him toffee crunch cupcakes instead. Lots of work involved but soooo worth it. Happy Birthday, my love.


Yield: about 30 cupcakes
Ingredients:
For the cupcakes:
2 cups all-purpose flour
¾ cup unsweetened cocoa powder (I used dutch process cocoa powder)
1 tbsp. espresso powder (I used Starbucks via instant coffee)
1 tsp. baking soda
½ tsp. salt (I used fleur de sel)
2 cups sugar
1 cup (2 sticks) unsalted butter, at room temperature
4 large eggs, at room temperature
2 tsp. vanilla extract
1 cup brewed coffee
1 cup toffee bits
For the ganache and toffee layer:
8 oz. bittersweet chocolate, finely chopped
1 cup heavy cream
3 tbsp. unsalted butter, at room temperature
1½-2 cups toffee bits
8 oz. bittersweet chocolate, finely chopped
1 cup heavy cream
3 tbsp. unsalted butter, at room temperature
1½-2 cups toffee bits
For the frosting:
5 large egg whites
1½ cups sugar
4 sticks unsalted butter, at room temperature
½ tsp. coarse salt
1 tbsp. vanilla extract
1/3 cup caramel sauce
5 large egg whites
1½ cups sugar
4 sticks unsalted butter, at room temperature
½ tsp. coarse salt
1 tbsp. vanilla extract
1/3 cup caramel sauce
Directions:
To make the cupcakes, preheat the oven to 350˚ F. Line cupcake pans with paper liners. In a medium bowl, combine the flour, cocoa powder, espresso powder, baking soda, and salt. In the bowl of an electric mixer, combine the sugar and butter and beat together on medium-high speed until light and fluffy, about 2-3 minutes. Beat in the eggs one at a time, mixing well after each addition. Blend in the vanilla. With the mixer on low speed, add in the dry ingredients in three additions, alternating with the coffee, beginning and ending with the dry ingredients. Mix each addition just until incorporated. Fold in the toffee bits with a spatula.
To make the cupcakes, preheat the oven to 350˚ F. Line cupcake pans with paper liners. In a medium bowl, combine the flour, cocoa powder, espresso powder, baking soda, and salt. In the bowl of an electric mixer, combine the sugar and butter and beat together on medium-high speed until light and fluffy, about 2-3 minutes. Beat in the eggs one at a time, mixing well after each addition. Blend in the vanilla. With the mixer on low speed, add in the dry ingredients in three additions, alternating with the coffee, beginning and ending with the dry ingredients. Mix each addition just until incorporated. Fold in the toffee bits with a spatula.
Divide the batter evenly between the prepared liners. Bake 18-20 minutes or until a toothpick inserted in the center comes out clean. Let cool in the pans 5-10 minutes before transferring to a wire rack to cool completely.
To make the ganache, place the chopped chocolate in a heatproof bowl. Add the cream to a saucepan and bring to a simmer. Remove from the heat and pour the hot cream over the chocolate; let stand 1-2 minutes. Whisk together until a smooth ganache forms. Whisk in the butter 1 tablespoon at a time until completely incorporated. Transfer the bowl to the fridge or freezer to chill the ganache to a pipeable consistency, whisking every 5-10 minutes to ensure even cooling. When slightly thickened, transfer to a pastry bag fitted with your tip of choice. Pipe a ring of ganache around the top of each cupcake, leaving a hole in the center. (I just poured the ganache into a deep mixing bowl and dipped the cupcakes. Saved me time on piping). Add the toffee bits to a bowl and dip the ganache portion of each cupcake into the toffee bits, pressing very gently to adhere. Let the ganache set.
To make the frosting, combine the egg whites and the sugar in a heatproof bowl set over a pot of simmering water. Heat, whisking frequently, until the mixture reaches 160° F and the sugar has dissolved. Transfer the mixture to the bowl of a stand mixer fitted with the whisk attachment. Beat on medium-high speed until stiff peaks form and the mixture has cooled to room temperature, about 8 minutes. (The bowl should be cool to the touch.)
Reduce the speed to medium and add the butter, 2 tablespoons at a time, adding more once each addition has been incorporated. If the frosting looks soupy or curdled, continue to beat on medium-high speed until thick and smooth again, about 3-5 minutes more (or longer - don’t worry, it will come together!) Blend in the salt, vanilla, and caramel until smooth and completely incorporated, scraping down the sides of the bowl as needed.
Fill a pastry bag fitted with a decorative tip with the frosting and pipe a frilly pile of frosting on top of each cupcake, filling the hole in the center of the ganache. Top with additional toffee pieces, if desired.
Source: adapted from Bakers Royale, originally from Alice Medrich
Friday, November 18, 2011
Free Recipe Card for our Cookie Exchange
I found this cute free recipe card and thought I'd share it with you. I just printed them out for our cookie exchange for tomorrow. I'm so excited! However, I still haven't decided on what kind of cookies to make. SIGH. I'm torn between a new and updated cookies and cream cookie recipe that I came up with and a chewy ginger chocolate cookie. I guess we'll see what kind of mood I'm in tonite. Here is the link for the free recipe card.
Enjoy!
Have a great weekend everyone! :)
P.S. Stay dry. I hear its gonna be raining all weekend.
Monday, November 14, 2011
The Next Best Thing: Cupcake Push Pops
Growing up, I loved eating ice cream push ups. I remember buying them at our school snack shop, The Buc Stop (we were the Buccanneers) during lunch recess. It was such a simple, easy way to eat and enjoy ice cream. For those of you who don't remember what those push ups are, here is a pic:


Most if not all of my baking trials are adapted from my fellow baking bloggers. They provide inspiration to my novice baking skills. So when I came across the idea of cupcake push pops, I knew it was something that would make my baking and decorating life much simpler.
Cake pops for example are pretty to look at, but the amount of time and effort it takes to create one is more than I would like to. Its a very long process, especially for creating specific characters such as Hello Kitty. There are plenty of other things I would like to do other than bake such as SLEEP.
These are much easier to create. All you have to do is make the batter, bake, cool, and pop one in the container and frost. Its very convenient for those who only want to enjoy one mini cupcake at a time and save the other for later. I made these for Kylie's BFF, Savannah's 6th birthday this past Saturday. They were a big hit! The only issue I saw when the kids were consuming these bad boys was they put too much pressure pushing the cupcakes out of the tube. There were a few casualties of course, but luckily there were plenty of cupcake push pops to go around. Happy 6th Birthday, Savannah!


I'm starting to finally make use of our SLR camera. So long to blurry Blackberry pics! ;)
Friday, November 11, 2011
Happy Holidaze
There are 45 days 'til Christmas which means I'm in a scramble to find yummy recipes. :P For the past few years, I've baked goodies and packaged them as gifts. I read an article in Family Circle today (while waiting for my prenatal appointment) that people actually prefer homemade gifts; its more meaningful and what better way to a loved ones heart than their stomach? I found a bunch of recipes, but now the hardest task is narrowing that long list down. Here are a few ideas of what I have in mind:


Caramel Apple Cookies
Cinnamon French Toast Cookies


I've also been asked to donate some cookies for my girl's bake sale at work. All proceeds will benefit The Share Our Strength: No Kid Hungry organization. I'm pretty sure I'm going to make the pecan pie cookies. It's perfect for getting folks in the Thanksgiving mood, which happens to be just around the corner. Aiyiyi. I've started stocking up on flour, sugar, and butter but the ingredients slowly but surely have begun to dwindle as I've been baking almost every day. I've been in a baking mood A LOT lately. Maybe that's just my way of nesting before the baby comes? ;)
Thursday, November 3, 2011
Happy 4th Birthday, Mikaeli!
The bf's neice is turning 4 this weekend and I'm baking these adorable frog shaped royal icing cookies (Princess and the Frog themed birthday):
 Luckily Sugar and Spice in Daly City carries frog cookie cutters. I plan on using fondant for the eyes and piping all the other details using royal icing. I'll post pics this weekend.

These are a few pics of Yo Gabba Gabba cookies I made last year for Mika's birthday:


Look at how small my old oven was compared to the cookies. Crazy how much baking I did in such a small space. This was my first attempt at royal icing but I promise I'm much better now...I think. ;)
Sugar Cookie Recipe


As you can see, the frogs are missing the hearts on their cheeks. I had such a difficult time piping for some reason and was only able to successfully decorate 12 out of 3 dozen+ cookies. I was tired, had a headache, and the baby kept kicking me throughout the cookie making process. It was a baking disaster! Needless to say, I was exhausted and had a huge headache the day of the party. :(
Below you will find the sugar cookie and royal icing recipes. I may do a batch of chocolate and regular sugar cookies since the chocolate ones were a big hit for Halloween.
These are a few pics of Yo Gabba Gabba cookies I made last year for Mika's birthday:


Look at how small my old oven was compared to the cookies. Crazy how much baking I did in such a small space. This was my first attempt at royal icing but I promise I'm much better now...I think. ;)
Sugar Cookie Recipe
taken from Cookie Craft
3 cups all purpose flour
1/2 teaspoon salt
1 cup (2 sticks) unsalted butter, softened
1 cup sugar
1 large egg
2 teaspoons vanilla* or 1 teaspoon vanilla plus zest of 1 lemon
food coloring (if cookie design calls for it)
*Instead of vanilla, you can use other extracts such as almond or peppermint.
1. Whisk together the flour and salt in a medium bowl.
2. Using your mixer, use the paddle attachment to cream together the butter and sugar until the mixture is light and fluffy. Add the egg and vanilla (and lemon zest, if you're using it) or your extract of choice and mix until well blended.
3. With the mixer on low, gradually add the flour mixture to the butter mixture until the two are thoroughly blended.
4. If your cookie design calls for adding food coloring, do so now, and continue blending until desired color is reached and is evenly incorporated.
5. Turn out dough onto work surface and divide into two or three equal portions, form each one into a rough disk.
6. Preheat oven to 350 degrees.
7. After you have rolled and cut the dough and the cookie shapes are on parchment-lined cookie sheets, bake them in the middle rack of the oven for 12-16 minutes or until the cookies start to turn slightly golden around the edges.
8. Cool cookies completely on a rack before icing or decorating.
Yield
2 1/2-inch cookies--about 30
3 1/2-inch cookies--about 16
4 1/2-inch cookies--about 12
Royal Icing taken from Bridget
4 TBSP meringue powder
scant 1/2 c. water
1 lb. powdered sugar
1/2 - 1 tsp light corn syrup
few drops clear extract (optional)
1. Combine the meringue powder and water. With the paddle attachment of an electric mixer, beat until combined and foamy.
2. Sift in the powdered sugar and beat on low to combine. (Do NOT skip the sifting!)
3. Add in the corn syrup and extract if desired. ( I think the corn syrup helps keep the icing shiny.) Increase speed to med-high/high and beat for about 5 minutes, just until the icing is glossy and stiff peaks form.
4. (You should be able to remove the beater from the mixer and hold up and jiggle without the peak falling.) Do not overbeat.
5. Cover with plastic wrap touching the icing or divide and color using gel paste food colorings. (I use both Wilton and AmeriColor food colors).
Tuesday, November 1, 2011
Post Halloween Candy Making
Now that the Halloween festivities are over, I've got more than half a bag of candy corn sitting on my kitchen counter. There is nothing more annoying than having a big, bright orange bag just laying around...right next to Ruby, my Kitchen Aid standing mixer. (Don't you just love her name?) I need to get rid of this bag STAT and found this homemade butterfinger recipe on Karly's blog.
I'm going to make these into truffles using a tiny cookie cutter and possibly add fleur de sel on top as the chocolate sets. I will post pics as soon as I make them tonite. :) But for all you visualists, here's the finished product:

Photo courtesy of Karly

Pic from my blackberry
Ingredients
- 3 cups candy corn
- 1 1/2 cups smooth peanut butter
- milk chocolate chips or candy melts, for dipping **I used dark chocolate candy melts of course
Instructions
- Place the candy corn in a large bowl and microwave for 1 minute. Stir and return to microwave. Continue heating for 30 seconds and then stirring until it is completely melted.
- Stir in the peanut butter. The heat from the candy corn should melt the peanut butter, but if not return to the microwave for 15 seconds. Stir to combine.
- Spread the mixture into an 8x8 baking dish lined with parchment paper. Smooth it out evenly in the pan. Let cool for one hour and then use a pizza cutter to slice into bars. **I let the candy mixture chill for about 10 minutes before using a larger piping tip as a cookie cutter. I wanted to make sure the mixture was stiff enough to maintain its shape but soft enough to remove the tip. Let me know if this makes sense.
- Melt the chocolate chips or candy melts in the microwave. ** I used my handy dandy Wilton melting pot.
- Carefully dip the candy bars into the melted chocolate and turn to coat.
- Place on a parchment lined baking sheet and wait for the chocolate to set. ** I added a bit of fleur de sel for more flavor.
- Store at room temperature for a chewy texture or in the fridge for a more crisp texture.
**End result: The homemade butterfinger candies/truffles had a different texture than what I had expected. The taste was there but the consistency was similar to that of nougat, kinda chewy and not as crunchy.
Subscribe to:
Posts (Atom)